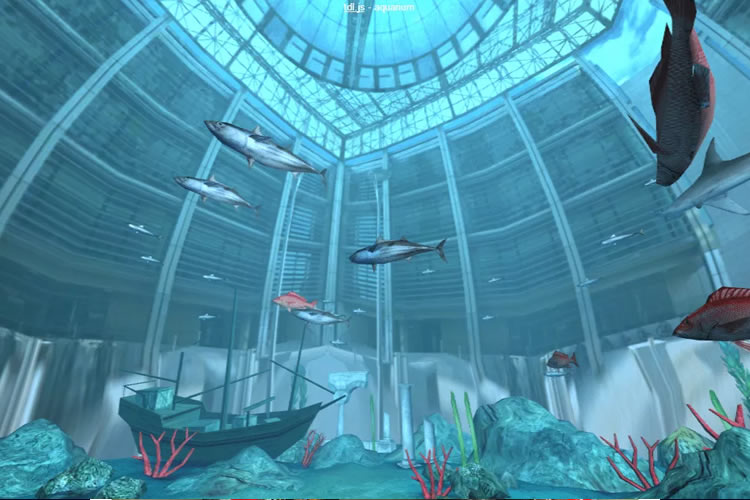
Articles Tagged '3D'
55 Unique 3D Models Looking Like Photographs From Real Life
3D modeling, also known as, meshing is the process of making an object in three-dimension with the use of software such as 3D Studio Max, Solidworks, Blender, etc. In our time today, 3D models are widely used by movies and video games as characters. Even the architecture industry now uses 3D model as the way of showing proposed structures. And in the world of designing, one great thing you can do to attract and put a touch of creativity is to use 3D as an element on their design. For viewers are getting amaze on how detailed and realistic objects are made. To amaze you more with this, I have rounded up in this article with the best 3D models you may find as your inspiration in making one.
25 Free 3D Modeling Applications And Websites: Create & Download
3D refers to objects that been created in 3 position (X, Y and Z). Now a days, there are a lot 3D objects that you can see in movies, product designs, logo, advertisements, etc. Even they are commonly seen these days but they are not easy to create. You need 3D authoring tool or website that offers ready-made 3D models to create a masterpiece. For this post, I know that this will cost a lot to non – professional users so I will be featuring open source 3D modeling tool and places where you can download free 3D models but be sure to read the owner's rights before you use it for your commercial or personal use.
40+ Beautifully Fresh 3D Text Effect Photoshop Tutorials
Typography is defined as the art and technique of arranging type, type design, and modifying type glyph, and in order for you to master this art you should learn more techniques and methods to manipulate text to create stunning typography art. Using 3D effects makes text & typography more realistic and brings it to life. In this article I compiled a list of 40+ 3D Text Effect Photoshop Tutorials for you to learn new 3D text effects.
Unique 3D Text – Xara 3D + Photoshop Tutorial
So hello again! It's time for my first tutorial I've ever been made. I actually hope You will enjoy this one, and that will encourage me to do some more. We will use Xara 3D to get 3D text effect, then export text to Photoshop and add some style there. If You haven't got Xara 3D, You can download demo for free ( 15 days trial) and You can read my review about Xara and their pros and cons. And yeah, If You don't want to download program I will give You *.psd file with text elements, so You can skip Xara part and get straight to Photoshop retouching part. Before we start here is what we will be creating today: Click on image to enlarge
1.Xara 3D tutorial part:
- Okay, let's open Xara 3D programm. By default there will be "X3D Version 6"
- Click on the Text options, press CTRL+A to delete existing text and type T, choose font, You like and press OK.
- 1.2. Now we will change text a little bit -
- 1. Click on Text toolbar, to get off that rounded circle;
- 2.Click on Bold - to make text little bigger;
- 3.Click on Lightning to show lightning arrows;
- 4. Click on Bevel options to change default Bevel settings;
- 1.3.
- 1.3.1. Change bevel shape to rolled to add little bit emboss effect;
- 1.3.2.Click to Round to round corners a little bit;
- 1.3.3. Change depth to 10 - to soften a little emboss effect;
- 1.4. Okay, now we will play with lightning and 3D effects.
- 1.4.1. Click on Text as shown and move Your mouse cursor to add any 3D effect while it is exactly as You want;
- 1.4.2. Click on the arrows and move them around to get glossy view and better lightning, if needed;
- 1.5.Okay, We are done in XARA, now let's export text to Photoshop:
- 1.5.1. Click File-Export or CTRL+SHIFT+E to get export view;
- 1.5.2. Choose where to save file,then do check everything like picture below, to add transparency choose *.png format and in the options click Transparent checkbox;
2.Adobe Photoshop part
If You are starting just from now on - click here to get *.zip file with all 4 *.png files. I will use many Photoshop keyboard shortcuts, if You want to learn about most useful ones, read my article - 48+ Greatest Adobe Photoshop Keyboard Shortcuts. 1.step- 1.1.Create a new document, call it TYPE, I used 1000x750 size.
- 1.2.Open T document in photoshop, press CTRL+A to select all, then CTRL+C, open Your TYPE document and press CTRL+V to drop it in the document;
- 1.3. resize text with CTRL+T and holding ALT+SHIFT to resize from center point and to resize it proportionally, rotate it to get better result;
- 1.4. Repeat those steps for all 4 text documents until You got result similar like mine:
- 1. Press G to activate gradient editor;
- 2.Click on radial gradient;
- 3.And then double click on the gradient editor, to get gradient editor;
- 4.Choose Foreground to background;
- 5.Use color codes to get output as mine, copy those RGB codes and use them: #f8b1d7, #8871a1
- 2. Now press CTRL+E to merge those layers into one, rename it - shadow and move it below all text layers.
- 3. Hit D to reset foreground/background color;
- 4.CTRL+CLICK on the shadow layer to select it, then press ALT+DELETE to fill it with black color;
- 5. Hit CTRL+D to deselect layer;
- 6.Go to Filter-->Blur-->Gaussian Blur and type 10 to radius pixels, hit OK;
- 7. Change opacity to ~40% to soften shadow;
- 1.Click on Elliptical Marque tool and change feather to 50px;
- 2.Hit D to reset background/foreground color;
- 3. Click CTRL+SHIFT+N to create a new layer;
- 2. Okay, now You have one text nicely colored. To copy layer style --> right click on the layer - click "copy layer style";
- 3.Click on the other text layer - right click and "past layer style", just change gradient overlay colors to get different results;
- 1.Download those curvy line brushes - of course, better is to make those curves in Illustrator and then just import to Photoshop, but I will not bother You to do it now. I am sure You want to get faster to the final illustration.
- 2. Load brushes into just by double clicking and find them clicking F5 - to get brushes panel.
- 3.Click CTRL+SHIFT+N to create new layer and move it to top of all layers.
- 4. I used white background color.
- 5. Now change opacity to ~60-70% and click E, to grab eraser tool and erase few places to get effect that those lines are rambling through the letters:
Forget About Classics: 75 Crazy And Creative Textured Websites
Textures are great way to highlight your website, give it an unique look and stand out from crowd offering something people have never seen and known is possible to do. With new browser and coding features you can design almost everything and make it web-safe. And I prefer textured websites much more than outworn web 2.0 style which is so 2008, subtle gradients tied with new technologies and possibilities are very popular in our days. That’s why I gathered many excellent examples with highly detailed websites using textures as one of the most important design elements.
How to Create a Nifty Dynamic Shadow with jQuery
First I want to welcome you to my very first article for 1stwebdesigner. Today I'll show you how to create a very nifty looking dynamic shadow with a few teaspoons of jQuery, a pinch of CSS and some transparent PNG’s as Base. I'll explain every line of used code, so you can easily follow along and create your own awesome looking dynamic shadow powered by jQuery.
60 Interactive, 3D And Astonishing Webdesigns Created In Flash
Advances in web technologies has paved the way for multimedia to go far beyond traditional means. Web browsing experience has been drastically improved with creative designs, 3D, mouse interaction, fun games, videos, sound, and astonishing animations, created on Flash platform. It makes extraordinary multimedia experience that attracts visitors.
50 Superb 3D Flash Websites You Must See!!!
It's not a secret that Flash websites can be considered as a different kind of art in website community because of their limitless animations and stunning designs. Flash websites can also be divided in two groups: 2D and 3D Flash websites. This showcase will consist from 50 3D Flash websites, which really stood out from crowd, have received unique attention and got awards! Don't think this is just another list - you'll find here endless inspiration in these websites, where each one of them is a huge masterpiece!
30 Logo Designs Using Gradient 3D Effects – Inspiration:Part 3
This is already the third part in gradient effect series, I hope you'll enjoy this one as you might like previous articles.
First one was about showcasing resources and premade gradients for Photoshop to get started, on the second part I made a research on how gradient effects are used in web designs and tried to look a little bit behind the scenes. Today you'll see 30 logo designs using the same gradient effects to get 3D effect using beautiful colors. Actually it's not so easy to create good looking logo using gradients, it comes from a lot of learning, but also that's great way to easily create unique logo design, if you know how to use gradients in right way. This is kind of inspirational article to show great examples of gradient use, in the next and last gradient related article I'll try to find really good Photoshop, Illustrator tutorials teaching you how to use gradients correctly, so stay with us and get inspired this time!
33 Outstanding Apophysis Tutorials: Part 2
So as promised I'll continue with Apophysis tutorial part separated in 3 parts for beginners, basic and advanced users. At the end of article You'll find 2 more links, where You can continue Your research if You are serious about this program. It was real fun and interest compiling this article and through research I saw there are really a lot to learn, but everything is based on math so You can create unbelievable fractals as seen in previous Apophysis inspirational article. Okay, now let the magic happen and good luck in Your own research!