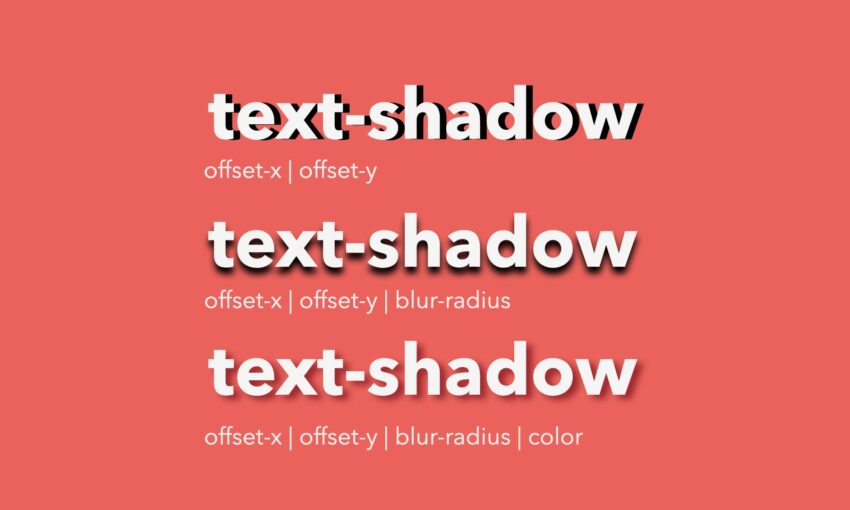
Articles Tagged 'text'

Quick Tutorial – Creating a Letterpress and Embossed Text Effects in Photoshop

In the past few years the letterpress text effect has become a huge trend in web design. It's being used in headers, headlines and even interfaces. The love for the letterpress effect has been transferred from printing machines to our computer screens. If done right letterpress can be a splendid and neat accent in your design. Another superb, yet often underrated, text effect is embossing. You may have seen it in some menus though. Text embossing is another effect which digital art has borrowed from traditional design. This tutorial will guide you through creating the letterpress and embossed text effect in Photoshop. The tutorial will be using some basic layer styles together with some more advanced techniques. If you're a beginner in Photoshop text effects, continue to read to find out how to achieve fantastic looking letterpress and embossed text effects in Photoshop.

Quick Tutorial – Creating a Letterpress and Embossed Text Effects in Photoshop

 Read more

A Simple Guide to Improving Web Typography

 Posted in: TipsToolsTypographyWeb DesignWritten by: StephanieJune 16th, 2011

With the advent of much improved browsers, text rendering and high-resolution screens, technology is no longer an excuse for poor typography. In many ways typography can be elegant and an expression of the designer’s ideas when chosen wisely. Today I will not only present you with guidelines to consider in mastering typography for the web, but give you the useful tools, techniques and resources to help you achieve effective designs. Feel free to suggest any other tools or resources in the comments section.

A Simple Guide to Improving Web Typography

 Read more

30 Useful and Cutting Edge CSS3 Text Effect and Web Typography Tutorials

CSS3 with it's possibilities is a revolution in web development. The new CSS3 properties give developers a wonderful chance to enhance their designs in a way that's quick and easy, yet visually impressive. What's more, almost all of the major browsers now support most of the CSS3 features so that's another reason for mastering the new techniques. One of the spheres CSS3 has changed dramatically is web typography. Text styling and neat effects can now be achieved without using any Javascript or images at all. This article presents 30 useful and cutting edge CSS3 text effect and web typography tutorials that will take your designs to the next level.

30 Useful and Cutting Edge CSS3 Text Effect and Web Typography Tutorials

 Read more

Unique 3D Text – Xara 3D + Photoshop Tutorial

So hello again! It's time for my first tutorial I've ever been made. I actually hope You will enjoy this one, and that will encourage me to do some more. We will use Xara 3D to get 3D text effect, then export text to Photoshop and add some style there.  If You haven't got Xara 3D, You can download demo for free ( 15 days trial) and You can read my review about Xara and their pros and cons. And yeah, If You don't want to download program I will give You *.psd file with text elements, so You can skip Xara part and get straight to Photoshop retouching part. Before we start here is what we will be creating today: Click on image to enlarge

1.Xara 3D tutorial part:

  • Okay, let's open Xara 3D programm.  By default there will be "X3D Version 6"
  • Click on the Text options, press CTRL+A to delete existing text and type T, choose font, You like and press OK.
  • 1.2. Now we will change text a little bit -
  • 1. Click on Text toolbar, to get off that rounded circle;
  • 2.Click on Bold - to make text little bigger;
  • 3.Click on Lightning to show lightning arrows;
  • 4. Click on Bevel options to change default Bevel settings;
  • 1.3.
  • 1.3.1. Change bevel shape to rolled to add little bit emboss effect;
  • 1.3.2.Click to Round to round corners a little bit;
  • 1.3.3. Change depth to 10 - to soften a little emboss effect;
  • 1.4. Okay, now we will play with lightning and 3D effects.
  • 1.4.1. Click on Text as shown and move Your mouse cursor to add any 3D effect while it is exactly as You want;
  • 1.4.2. Click on the arrows and move them around to get glossy view and better lightning, if needed;
  • 1.5.Okay, We are done in XARA, now let's export text to Photoshop:
  • 1.5.1. Click File-Export or CTRL+SHIFT+E to get export view;
  • 1.5.2. Choose where to save file,then do check everything like picture below, to add transparency choose *.png format and in the options click Transparent checkbox;
Do this with every letter, change 3D effects, maybe colors - play with options until You are satisfied. I got 4 png files at the end, one for every letter - T,Y,P,E.

2.Adobe Photoshop part

If You are starting just from now on - click here to get *.zip file with all 4 *.png files. I will use many Photoshop keyboard shortcuts, if You want to learn about most useful ones, read my article  - 48+ Greatest Adobe Photoshop Keyboard Shortcuts. 1.step
  • 1.1.Create a new document, call it TYPE,  I used 1000x750 size.
  • 1.2.Open T document in photoshop, press CTRL+A to select all, then CTRL+C, open Your TYPE document and press CTRL+V to drop it in the document;
  • 1.3. resize text with CTRL+T and holding ALT+SHIFT to resize from center point and to resize it proportionally, rotate it to get better result;
  • 1.4. Repeat those steps for all 4 text documents until You got result similar like mine:
2.step Now lets create some background,click on background layer to make it active:
  • 1. Press G to activate gradient editor;
  • 2.Click on radial gradient;
  • 3.And then double click on the gradient editor, to get gradient editor;
  • 4.Choose Foreground to background;
  • 5.Use color codes to get output as mine, copy those RGB codes and use them: #f8b1d7, #8871a1
Now click and pull Your mouse like in the picture to get same result: 3.step Now let's add shadow to create more realistic effect: 1. Select all four text layers - easy technique is to select first layer, hold SHIFT and select on last layer You want to select, then right click and press duplicate;
  • 2. Now press CTRL+E to merge those layers into one, rename it - shadow and move it below all text layers.
  • 3. Hit D to reset foreground/background color;
  • 4.CTRL+CLICK on the shadow layer to select it, then press ALT+DELETE to fill it with black color;
  • 5. Hit CTRL+D to deselect layer;
  • 6.Go to Filter-->Blur-->Gaussian Blur and type 10 to radius pixels, hit OK;
  • 7. Change opacity to ~40% to soften shadow;
4.step I added more shadow to make it more realistic, You can skip this step if You want:
  • 1.Click on Elliptical Marque tool and change feather to 50px;
  • 2.Hit D to reset background/foreground color;
  • 3. Click CTRL+SHIFT+N to create a new layer;
4.Click and drag marque tool below the letters, then change opacity to ~20-40%; 5. step In this step we will add some colors to actual text, I took idea here actually from Nick Ainley's work - 1.Double click on T text layer to get blending options: Check everything as in the pictures below, to get different colors just play with gradient overlay:
  • 2. Okay, now You have one text nicely colored. To copy layer style --> right click on the layer - click "copy layer style";
  • 3.Click on the other text layer - right click and "past layer style", just change gradient overlay colors to get different results;
My result is like this: 6.step Okay now lets add some more interesting background and styling:
  • 1.Download those curvy line brushes - of course, better is to make those curves in Illustrator and then just import to Photoshop, but I will not bother You to do it now. I am sure You want to get faster to the final illustration.
  • 2. Load brushes into just by double clicking and find them clicking F5 - to get brushes panel.
  • 3.Click CTRL+SHIFT+N to create new layer and move it to top of all layers.
  • 4. I used white background color.
  • 5. Now change opacity to ~60-70% and click E, to grab eraser tool and erase few places to get effect that those lines are rambling through the letters:
Do this in big zoom ( click ALT+ Mousewheel to zoom in/out), so You can erase lines more precise: Repeat those steps, add some blending options to get Your own unique results! This is my final result: If You couldn't do something, check out my *.psd file - click here to download. If You couldn't do anything - please ask, I will be here to help You!

Unique 3D Text – Xara 3D + Photoshop Tutorial

Become Master of Text Effects With 40 Adobe Fireworks Tutorials

 Posted in: TutorialsWritten by: Gustavs JurisonsJune 26th, 2010

Adobe Fireworks is a bitmap and vector graphics editor. It is aimed at web designers for rapidly creating website prototypes and application interfaces. It is designed to integrate easily with other former Macromedia products, such as Dreamweaver and Flash. While Fireworks CS5 packs a lot of new features, it is still possible to achieve completion of these tutorials listed below. From my own experience, it’s hard to get started learning this program because you will face some obstacles. But take your time and be patient and you will master Fireworks in no time.

Become Master of Text Effects With 40 Adobe Fireworks Tutorials

 Read more

22 Advanced CSS Text Effects And Web Typography Tips

You definitely should have seen those advanced CSS text effects for now already, they are rapidly getting popular as upcoming and current trend in good webdesign. The best thing about these effects is, it can be achieved with pure CSS, no more image replacements and image heavy web designs. In this article I showcased all the best explained CSS tutorials and typography tips I found and thought you definitely must read! Scroll through or definitely save this article to bookmarks so the next time you create new design in Photoshop with letterpress, shadowed etc. effects - you can create them just with pure code!

Typography takes also very important role in good web designs, so I strongly recommend to read articles I featured there as well! Enjoy and get inspired for your new, advanced web designs!

22 Advanced CSS Text Effects And Web Typography Tips

 Read more

Easy Brush Text Nature Effect: Tutorial

 Posted in: Quick TipsTutorialsWritten by: Dainis GraverisOctober 16th, 2008

Today we will learn how to use text layer letters as paths to create amazing effects. You can use this trick in many different ways, just changing brushes and brush options. Also we will learn how to use pen tool again together with brush tool and change different options. I tried to write everything pretty detailed, so everybody could understand and also added *.psd version for everybody to check out, if something in Your work is wrong. Check finished result on the bottom of this page and good luck completing this tutorial! So join with me to  these 10 simple steps!

Easy Brush Text Nature Effect: Tutorial

 Read more

2 in 1 – Stunning 3D Ice Text Effect Tutorial

I wanted to create very natural Ice text separately and later add it to iceberg image. In this tutorial we will learn to use different filter settings, create 3D text effect, different layer styles and much more! I hope it's not too complex, I tried to keep it as simple as possible. Scroll down the page to see finished result we will accomplish! And just be sure to check out this tutorial and join me to these simple steps !!!

2 in 1 – Stunning 3D Ice Text Effect Tutorial

 Read more

Page: 1 of 1

   
US