This tutorial is also suitable for setting up your local WordPress server. Testing many things (CMSes, themes etc.) on the internet for me and many others is sometimes a big pain and it has many disadvantages.
You need to buy a domain, pay for hosting, use your internet providers slow upload speeds to upload a files over ftp, and whenever you want to change some configuration of Apache or PHP you have to contact your hosting provider and wait some time until they respond. I could continue with other disadvantages, but I think you get the picture.
Your Designer Toolbox
Unlimited Downloads: 500,000+ Web Templates, Icon Sets, Themes & Design Assets

There are many all in one packages, which will install all together like WAMP or XAMPP, but I do not like them. In my opinion, they make a lot of uncontrolled rubbish on the computer and they are not often up to date. But they are good as a very fast solution for people who do not want to learn how it all works and they only need the fastest way to install local web server, to test their projects.
This tutorial is more complicated than a WAMP or XAMPP solution but the biggest advantage is that you have all over your control – because you configure all by yourself. And you can be always up to date and enjoy the latest fixes and improvements in Apache, PHP and MySQL packages.
As soon as you master this tutorial, you will agree that a local server can be installed using original packages in a few minutes, like the WAMP or XAMPP. Updating with new packages is also really simple. Just install the new package over the existing one and that is it.
Who Should Read This Local Web Server Setup Tutorial?
This tutorial is great for web developers and web designers who need real-time testing of web-based applications or themes for WordPress, Joomla, Drupal without need of an internet connection or web hosting.
It will also cover and make you aware of all the most important mistakes and unexpected errors which sometimes happen that other tutorials often do not cover. So users who will follow this tutorial step by step, should have a working localhost web server without any unexpected errors by the end.
I decided to write this tutorial because I followed many tutorials on the web, but I was not able to get my servers to work on the first try, so I spent many hours of searching and fixing unexpected errors, which are all covered in this tutorial.
Quotes in Tutorial
I often use quotes to put syntax, commands, login names, passwords, paths, and the names of the folders between them.
So whenever you see quotes in the tutorial, always use only what is between the quotes. It will be marked as bold text too. Sometimes there are quotes between quotes, these quotes (between quotes) are important to use in configuration files.
Requirements
This tutorial was made on 32bit Windows 7 Ultimate in VMware Player, but I am using it on a real installation of 64bit Windows 7 Ultimate without any problem. I have also used it on a 64bit version of Windows Vista Ultimate before.
So in that case it should work on any Microsoft operating system. Even if the packages are 32bit they do work on 64bit operating systems without any incompatibility issues. There are unofficial 64bit packages for Apache and PHP, but their installation is much more complicated and they are not often updated. Only official support for 64bit operating systems has MySQL, but it would not work properly with 32bit Apache and PHP.
Downloads
- Apache 2.2.15 win32 x86 no ssl msi
- PHP 5.3.2 VC6 x86 Thread Safe Installer
- phpMyAdmin 3.3.2 zip
- Optional – WordPress
If you find any new versions of these packages, you can use them too, the steps will be the same.
Pre-installation Steps
1. For better orientation I often create a specific folder structure for installation and for the folder where my test web pages are stored. I recommend you to follow the same structure; otherwise you will have to change all paths to your own settings during the tutorial steps.
The first directory I create is called “dev” (from the word development) in the root of “C:\“. The second directory I create is called “progs” in “C:\dev\” and the third is called “www” in “C:\dev\” So after that you should have three new directories.
- C:\dev\
- C:\dev\progs\ – for the installation of Apache, PHP and MySQL
- C:\dev\www\ – this folder is like the ftp folder on your hosting, so you will extract all your webpages here
2. Users of Windows XP can skip this step! It is for Vista, Windows 7 and 10 users! Disable UAC! You will do it by clicking on Start>Control Panel>User Accounts and then click on “Change User Account Control settings”.
On the next window (remembering the default position of the slider) pull the slider down to “Never notify me when:…”, click on OK and close the windows. Vista users – just turn off User Account Control.
Do not restart the computer now! For security reasons the slider should be reverted to default settings after successful installation of Apache, PHP and MySQL.
3. Modify the Windows hosts file. In some cases I could not get the installation work until I did this step. I did not test this on Windows XP, so XP users can also probably skip this step, because in my opinion it is not needed.
This file called hosts is often placed in “C:\Windows\System32\drivers\etc\“, it is hidden and it is read only. To see hidden files go to Start>Control Panel>Folder Options, click on tab “View”, select “Show hidden files, folders, and drives” and then click OK.
On x64 systems it will not be visible in 3rd party 32bit file managers like Total Commander even if you set settings to see hidden files and folders, because 32bit programs can not see 64bit files and folders.
So navigate to this directory through Windows native file Explorer to get to the hosts file properly. Open the file in notepad, search for the line: “# 127.0.0.1 localhost“, delete the “#” symbol, save the file and now you can restart the computer to apply both settings.
Now we are done with pre-installation Steps.
Apache installation and configuration
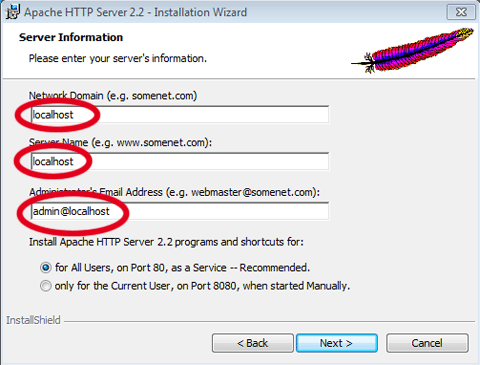
Run the installation of Apache, click next, check that you accept the terms, click next and next again. On the next screen fill in the Server settings, like on the picture below, and click next again.
On the next page select Custom Setup Type and click next. All features leave as they are, change only the installation path to “C:\dev\progs\Apache\” and click Next.
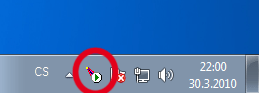
Now click install. After the installation you should see new icon on the windows taskbar with a small green triangle which signalizes that Apache is installed and running.
To test it properly open Internet Explorer, Firefox or whatever browser you are using and type “localhost” into your address bar. If everything went well you should see “It works!”
Now we need to edit the Apache configuration file! Go to the folder “C:\dev\progs\Apache\conf\” and open the file “httpd.conf” in Notepad.
For better, more comfortable editing, I recommend advanced text editor like Adobe Dreamweaver or free PSPad, because you can see line numbers and navigation through the text file will be more comfortable.
- Go to line 117 or search for “#LoadModule rewrite_module modules/mod_rewrite.so” and delete the “#” at the start of the line – in other words uncomment the line (good for nice URLs)
- Go to line 178 or search for “DocumentRoot “C:/dev/progs/Apache/htdocs”” and replace it with “DocumentRoot “C:/dev/www”“
- Go to line 205 or search for “<Directory “C:/dev/progs/Apache/htdocs”>” and replace it with “<Directory “C:/dev/www”>“
- Go to line 208 or search for “Options Indexes FollowSymLinks” and replace it with “Options Includes Indexes FollowSymLinks MultiViews“
- Go to line 225 or search for “AllowOverride None” and replace it with “AllowOverride All“
- Go to line 240 or search for “DirectoryIndex index.html” and replace it with “DirectoryIndex index.html index.htm index.php“
- Go to line 382 or search for “AddType application/x-gzip .gz .tgz” do not replace anything, just add new line below this line with text “AddType application/x-httpd-php .php“
That is it, save the file, exit the editor and restart Apache. You can do it by clicking on the taskbar Apache icon and then move the cursor on the Apache 2.2 and click restart.
At this state if you point your browser again to “localhost” you won’t see “It works!” but just something like “Index Of”. Do not worry, it is due to changing the directory from where Apache translates the web pages. Apache installation and configuration is now completed!
PHP Installation and Configuration
Run the downloaded PHP install package. Click Next, accept the terms and click Next again. On the next screen click Browse and navigate the installation program to install PHP to “C:\dev\progs\PHP\” and click Next.
Now select Apache 2.2.x Module and click Next again. At this step you need to tell the installation program where the Apache configuration file (we have edited in apache configuration) is.
So navigate the installation by clicking on the button Browse to the directory “C:\dev\progs\Apache\conf\” and click Next. On the next screen click Next again and then on the Install.
If all went well you should see following new lines at the end of Apache configuration file “httpd.conf“:
#BEGIN PHP INSTALLER EDITS - REMOVE ONLY ON UNINSTALL
PHPIniDir "C:/dev/progs/PHP/"
LoadModule php5_module "C:/dev/progs/PHP/php5apache2_2.dll"
#END PHP INSTALLER EDITS - REMOVE ONLY ON UNINSTALL
Now we need to configure the PHP configuration file “php.ini” which is in the folder “C:\dev\progs\PHP\“, so open it in Notepad, PSPad or Dreamweaver and change the lines like this (the PHP should also work with the original php.ini, but these changes are recommended for more comfortable using):
- Go to line 458 or search for “memory_limit = 128M” and change it to “memory_limit = 512M” (define how much memory can PHP use)
- Go to line 531 or search for “display_errors = Off” and change it to “display_errors = On” (if there are some errors it will be shown in web browser, if this settings are set to on)
- Go to line 542 or search for “display_startup_errors = Off” and change it to “display_startup_errors = On“
- Go to line 728 or search for “post_max_size = 8M” and change it to “post_max_size = 100M“
- Go to line 879 or search for “upload_max_filesize = 2M” and change it to “upload_max_filesize = 2000M“
- Go to line 959 or search for “;date.timezone =” and replace it with “date.timezone = “XXX/XXX”“. Where the XXX/XXX means your actual position, for me it is Europe/Prague, to find your position look here. For example for people living in Brazil – Sao Paulo, it should look like this “date.timezone = “America/Sao_Paulo”“
That’s it. Save the file, exit editor and restart Apache. Now we need to test if the PHP works. So navigate to directory “C:\dev\www\” and create a new text file called “index.php” and put this”<?php phpinfo(); ?>” as a text inside, save the file and exit.
Open your web browser and point it to “localhost“. If PHP is successfully installed you should see the same like on the following picture.

MySQL Installation and Configuration
This is the easiest part, because all is configured in the installation wizard. Just run the MySQL installation file. Click next, choose Custom and then click Next, change the installation directory to “C:\dev\progs\MySQL\“, click Next once more and then Install.
After the installation completes you will see another screen, so once again click, Next, Next, check “Configure the MySQL server now” and uncheck “Register the MySQL server now“, then click Finish.
On the next screen click Next, then select “Detailed Configuration” and click Next, select “Developer Machine” and click Next, select “Multifunctional Database” and click Next, other screen leave as is and click Next, select “Decision Support (DSS)/OLAP” and click Next.
Now check “Enable TCP/IP Networking“, leave port number 3306, check “Add firewall exception for this port“, check “Enable Strict Mode” then click Next.
Select “Best Choice For Multilingualism” and click Next. Check “Install As Windows Service“, select service name “MySQL5“, check “Launch the MySQL Server automatically” and check “Include Bin Directory in Windows PATH” then click Next.
Check “Modify Security Settings” and as a “New root password” use “root” without the quotes, confirm password, other things leave as they are and click Next. Last step is to apply all settings we have done, so click on Execute and wait until you see this:
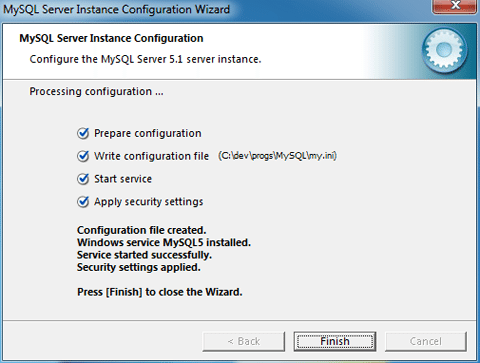
If you do not see this picture there is something wrong. And it should be many things. I will try to help in comments. But I expect there will not be any problems.
phpMyAdmin installation and configuration
phpMyAdmin is web-based MySQL database manager. For me personally it is the best and easiest solution for managing and creating databases even if it runs on localhost.
There is a solution from MySQL developers called MySQL GUI Tools, which runs on Windows operating systems, but it is not providing the easiest survey and it is a bit chaotic for me. Also many users using web hosting services for their web pages knows phpMyAdmin very well.
I often install WordPress, Drupal, Joomla and vBulletin together to test themes etc. and I use a single database for each CMS so that is why I use phpMyAdmin, which allows me to create databases in a friendly way without knowledge of the MySQL command line.
We will start with creating a directory called “pma” in “C:\dev\www\“. Now open the zip file with phpMyAdmin and extract all content of the directory “phpMyAdmin-3.3.2-all-languages” to “pma” directory.
Now open your favourite web browser and point it to “localhost/pma” if you are lucky, you should see the phpMyAdmin login screen. You can login to phpMyAdmin by entering “root” as the login name and password.
Sometimes on Vista and Windows 7, maybe on XPs operating systems too, you will get some kind of error saying that PHP is not installed or configured properly. This is one of the very often unexpected errors which I was searching for a solution for many hours, before I solved it!
The solution could be simple – first is go to the directory “C:\dev\progs\PHP\“, find a file called “php5ts.dll” and copy it to “C:\Windows\” and “C:\Windows\System32\” directories and restart Apache. Maybe Apache will refuse to start and it will show errors, if so, ignore the error and start again. It should work now! :)
After this fix you should see the phpMyAdmin login page by pointing your browser to “localhost/pma“. If the first solution did not help the problem has a lot to do with Windows write folder permissions and PHPs session save path and Temp directories.
PHP has no rights to write to desired Temp directories. This problem is really individual and if someone will report it in the comments I will help him/her individually.
So login to phpMyAdmin and you will get to the phpMyAdmin database administration interface. On the left panel, you will see actual databases, which is important to run MySQL properly, so do not delete them at any time.
On the right side you will see some information about your web server, you can change a theme or language or create a new database. On the bottom you will see some errors, which we are going to fix. For basic use it is not necessary, but I can’t stand something showing errors :-)
First we must create some tables to unlock phpMyAdmin’s full potential, so at the left panel click on the database called “test” and then click on “Import“.
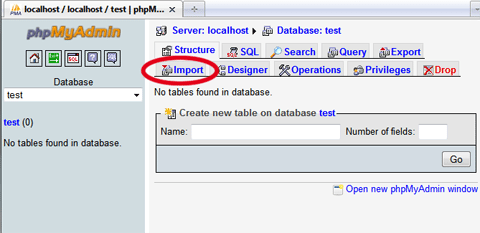
After that, click on the Browse button and navigate phpMyAdmin to the folder “C:\dev\www\pma\scripts\” and select a file called “create_tables.sql” and in phpMyAdmin in the right bottom corner click on “Go“. It will create a new database called phpmyadmin with 9 tables.
It will be used for phpMyAdmin advanced features, like creating PDFs etc. You can close the browser and look forward to the last part – editing phpMyAdmin configuration file :-). So go to the folder “C:\dev\www\pma\” and open file “config.sample.inc.php” in Notepad, Dreamweaver or PSPad.
- We need to edit line 18 defining the blowfish secret passphrase. It is completely up to you what you enter between the quotes so it can look for an example like this “$cfg[‘blowfish_secret’] = ‘ 1M41Oie6q9E3w#7U0M^3f3Tyzr5r93 ‘;“
- Go to line 36 and replace “$cfg[‘Servers’][$i][‘extension’] = ‘mysql’;” with “$cfg[‘Servers’][$i][‘extension’] = ‘mysqli’;”
- Now we need to delete “//” at the start of the following lines:
(also change default pma user to root)
$cfg['Servers'][$i]['controlpass'] = 'root'; (also change default pmapass password to root)
$cfg['Servers'][$i]['pmadb'] = 'phpmyadmin';
$cfg['Servers'][$i]['bookmarktable'] = 'pma_bookmark';
$cfg['Servers'][$i]['relation'] = 'pma_relation';
$cfg['Servers'][$i]['table_info'] = 'pma_table_info';
$cfg['Servers'][$i]['table_coords'] = 'pma_table_coords';
$cfg['Servers'][$i]['pdf_pages'] = 'pma_pdf_pages';
$cfg['Servers'][$i]['column_info'] = 'pma_column_info';
$cfg['Servers'][$i]['history'] = 'pma_history';
$cfg['Servers'][$i]['tracking'] = 'pma_tracking';
$cfg['Servers'][$i]['designer_coords'] = 'pma_designer_coords';
Save the file in the same folder as “config.inc.php” and exit the editor. phpMyAdmin should now work without any errors and we are done with the whole installation of the localhost web server. Now you can restore your UAC settings as we were talking about at the beginning.
Optional – installing CMS (WordPress 2.9.2)
First we must create a new database for WordPress, so login to phpMyAdmin and under the text “Create New Database” fill the name “WordPress” and click on Create.
Now go to the folder “C:\dev\www\” and create a new folder called “wp“. If you have downloaded the WordPress 2.9.2 installation open the zip file and extract all content of the WordPress directory to “C:\dev\www\wp\“.
Open your browser and point it to “localhost/wp“, If all was done well, you should see first the WordPress installation page, so click on “Create a Configuration File” and then on “Lets go!” On the next page.
On the following page fill in the database name, which is “WordPress” and User Name and Password which is “root” for both. This is the password for WordPress to write tables in the database not for accessing the CMS admin panel.
All other values can stay as they are, click “Submit” and then “Run the Install“. Fill in the Blog title, as you wish and in the email field, enter any true email address. Sending emails will not work because our Apache is not configured for sending emails, but who cares?
We do not need it on a localhost! ;-) Then continue with the install. On the next screen you’ll see your login and password, write it down somewhere, and click on “Log In” to get to the WordPress admin interface. Here you can change the password to something easier to remember.
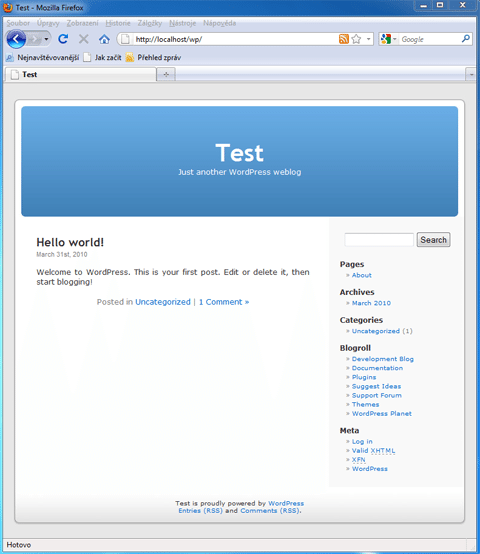
You are done. If you point your browser now to “localhost/wp” you will see something like this:
Now you know the basics of how to install any other CMS you prefer. Installations of Drupal or Joomla are very similar.
Conclusion
I told you that it is not so complicated ;-) If you are like me, you like a good coffee in your favourite café (which unfortunately has no internet connection). And if you like to work in the company of people and not be alone at home or in an office, you will probably appreciate this tutorial.
Most of you are most likely using WAMP or XAMPP solutions, some of you are using my solution in a more advanced way, which Apache configurations offer, but I know many web designers and web developers who do not know about these solutions and this tutorial is exactly for them.
If you are facing any problem let me know and I will try my best to help you.
This post may contain affiliate links. See our disclosure about affiliate links here.