Everyone on the web is updating to the latest & the most secure technologies with Twitter being the most hyped one as it upgraded from basic Authentication to the more secure Twitter oAuth. Earlier people had to risk their Twitter login credentials if they wanted to use some external Apps that gave them more control over their Twitter profile. Twitter would now be removing the basic Auth to fully support oAuth. As Twitter describes oAuth is:
OAuth is an authentication protocol that allows users to approve application to act on their behalf without sharing their password. More information can be found at oauth.net or in the excellent Beginner’s Guide to OAuth from Hueniverse.
Your Designer Toolbox
Unlimited Downloads: 500,000+ Web Templates, Icon Sets, Themes & Design Assets

DOWNLOAD THE LIBRARY HERE!
NOTE: I strongly suggest that you should click on each of the screen-shots below, so that you can clearly understand what’s going on!
Before starting up, I also suggest you to read the other article on Updating Twitter using PHP as it has some background information about this article. Read it here!
Creating a Twitter oAuth And PHP Library Application
In the first section of this article you will be able to learn, how to create a great but simple app that can update your Twitter status. Ready? Let’s roll.
SETTING IT UP
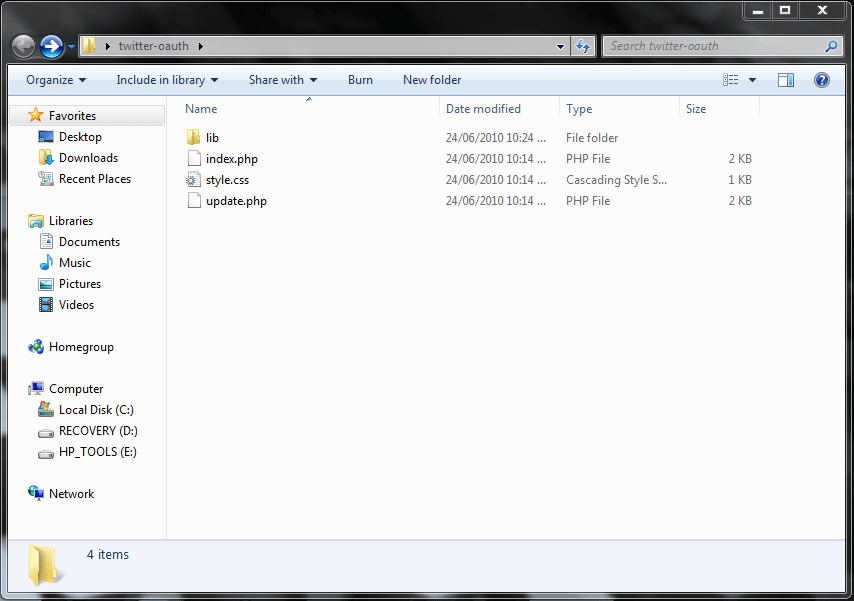
To get started open up notepad or any other code editor and make three files “index.php, style.css & update.php“. Now download the “download this oAuth library” made by Jaisen Mathai “here“. It is a ready-made library “stamped” by Twitter’s API (itself) which helps you to connect to Twitter using oAuth. Now place all these files in a folder and they should look something like this:
REGISTERING YOUR APPLICATION ON TWITTER
First of all we’ll need to register an app for you on Twitter so that you get your API keys you’ll use.
After reading that previous statement a question might have taken birth in your mind, What’s the purpose of getting these API Keys from Twitter?
We need the API Keys for getting our Application (app) registered on Twitter so that Twitter gives us the right to get the users/visitors authenticated and get their credentials/profile info from Twitter. With the increasing number of Twitter account frauds these days, I think that oAuth is the best step taken by Twitter towards user security. Also, the API keys let Twitter know of the URL where the user will be redirected to after successful authentication/login.
So for that (getting our app registered on Twitter) click here or go to http://twitter.com/apps. Note that you’ll need to login with your Twitter account to register an APP. The registration page that twitter provides is like the one below. I’ll describe everything as we go on!
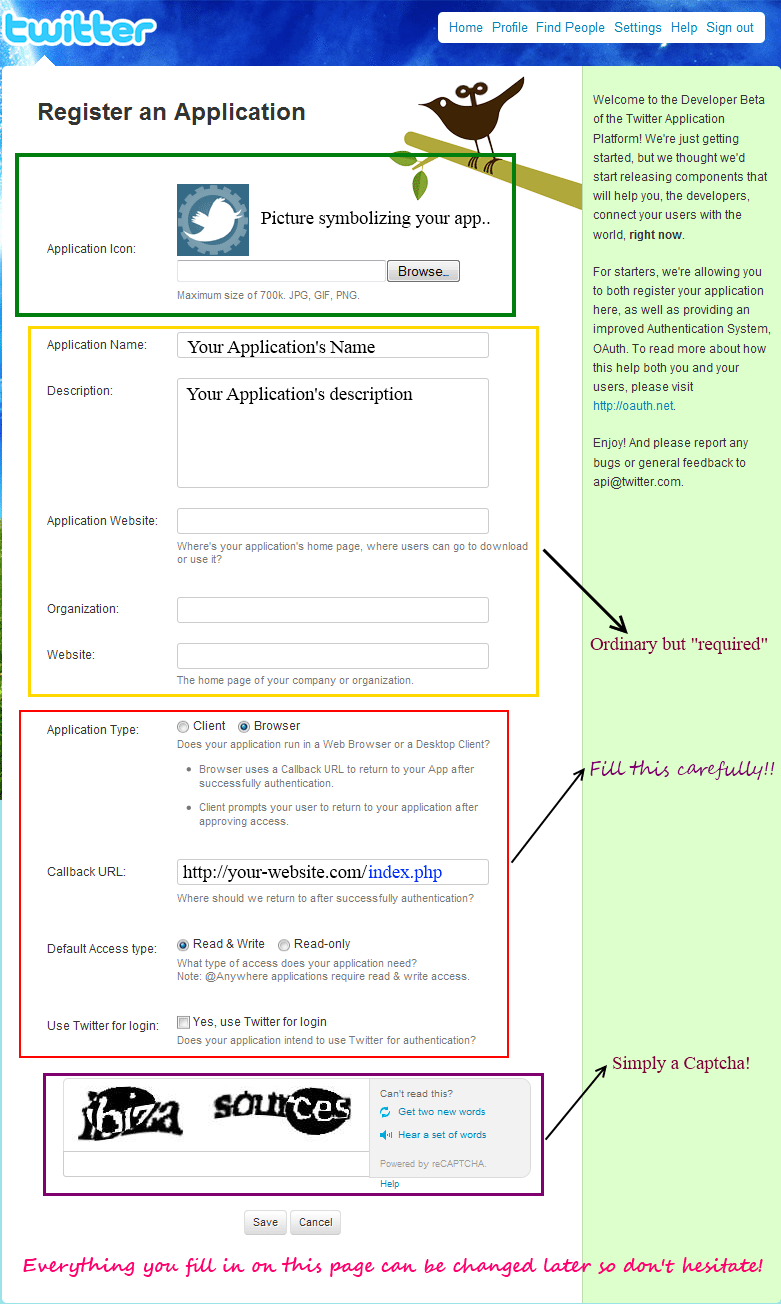
I have explained the form on the screenshot above so I strongly advise you to have a close look to the form and see what to fill. Below, I have explained all the elements of the file;
- Application Icon: If you want to give a pictorial representation to your app then this is the way!
- Application Name: Your application’s name. Be ultra-sure to make it catchy!
- Description: A small description for your application.
- Application Website: A direct link to your application’s website. (For reference)
- Organisation: Your organisation {Your may name your website here}, although not needed.
- Website: Your Organisation’s website {Your main homepage}, not needed {just for reference}
- Application Type: This will probably be Browser unless you use T oAuth in a software.
- Callback URL: The URL where Twitter should redirect a user after successful authentication! {See the screenshot for more}
- Default Access Type: It should be Read & Write unless you just need to use the profile information of a user.
- Use Twitter for login: If you are using Twitter as a Login to your website/application then check this otherwise no need!
- Captcha: That’s the most difficult part! ;) haha..Just a captcha and is required!
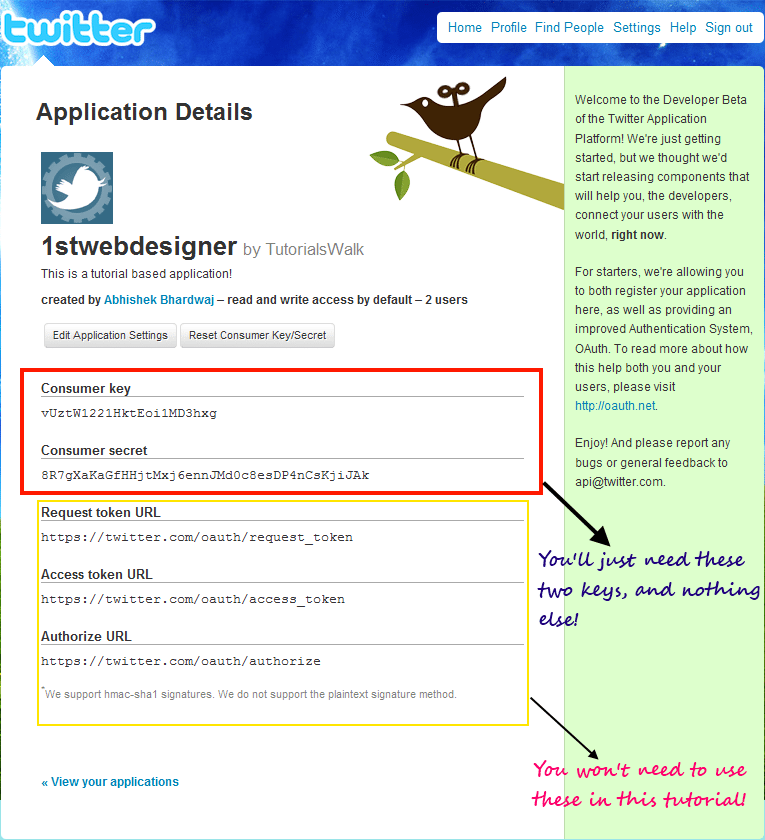
After that just click on Save and you’ll be redirected to a page where Twitter will give you your API info. in the form of a Consumer Key & the Consumer Secret Key. The page will look something like the one below:
PREPARING TO MAKE THE APPLICATION
To get started, we’ll first need to fill the API keys, we got from Twitter in our Application’s library so that we don’t get confused later on! To do so open the secret.php file in the lib folder and you’ll see something like below:
<?php

$consumer_key = '<PLACE YOUR CONSUMER KEY HERE>';
$consumer_secret = '<PLACE YOUR CONSUMER SECRET KEY HERE>';
?>
Now just add the Consumer Key & the Consumer Secret you got from Twitter in between the quotes. Below is the copy of the secret.php file that 1stwebdesigner’s Twitter application is using:
<?php
$consumer_key = 'vUztW1221HktEoi1MD3hxg';
$consumer_secret = '8R7gXaKaGfHHjtMxj6ennJMd0c8esDP4nCsKjiJAk';
?>
These API keys {consumer key, consumer secret} enable Twitter to redirect and process your oAuth request to Twitter for login.
OUR APPLICATION FILES
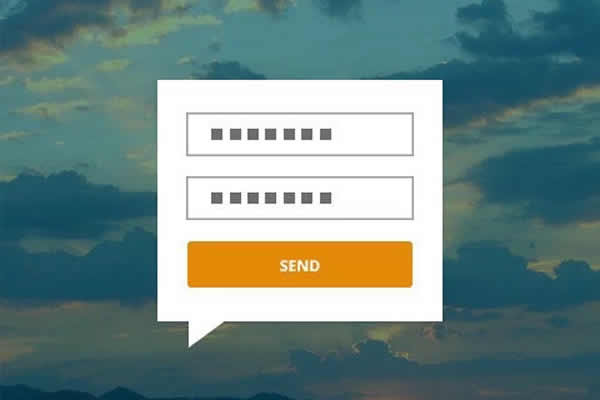
Index.php: Basically this file will do all our work as it shows the “Sign In Through Twitter” button and then processes all our oAuth request using the oAuth library we are using. Co-incidentally, Twitter also redirects the user to this file after successfull authentication {Remember the screenshot above ?}
Update.php: You’ll update your Twitter status using this file. Uses index.php file for form processing. (Explained below!)
Style.css: Contains all the styles that we’ll use for our application.
WRITING THE APPLICATION
Open the Index.php file you made and add the following code to it:
<?php

session_start();

include 'lib/EpiCurl.php';
include 'lib/EpiOAuth.php';
include 'lib/EpiTwitter.php';
include 'lib/secret.php';

$twitterObj = new EpiTwitter($consumer_key, $consumer_secret);
$oauth_token = $_GET['oauth_token'];
 if($oauth_token == '')
 {
 $url = $twitterObj->getAuthorizationUrl();
 echo "<div style='width:200px;margin-top:200px;margin-left:auto;margin-right:auto'>";
 echo "<a href='$url'>Sign In with Twitter</a>";
 echo "</div>";
 }
 else
 {
 $twitterObj->setToken($_GET['oauth_token']);
 $token = $twitterObj->getAccessToken();
 $twitterObj->setToken($token->oauth_token, $token->oauth_token_secret);
 $_SESSION['ot'] = $token->oauth_token;
 $_SESSION['ots'] = $token->oauth_token_secret;
 $twitterInfo= $twitterObj->get_accountVerify_credentials();
 $twitterInfo->response;

 $username = $twitterInfo->screen_name;
 $profilepic = $twitterInfo->profile_image_url;

 include 'update.php';

 }

if(isset($_POST['submit']))
 {
 $msg = $_REQUEST['tweet'];

 $twitterObj->setToken($_SESSION['ot'], $_SESSION['ots']);
 $update_status = $twitterObj->post_statusesUpdate(array('status' => $msg));
 $temp = $update_status->response;

 echo "<div align='center'>Updated your Timeline Successfully .</div>";

 }

?>
Now I’ll be explaining the whole code used above below (in point form):
- We start off by firing our session using:
session_start();
The pre-built PHP function that we are usign above just creates a session or resumes the current one.
- To keep the application as simple as we can we include all the files from the library including the secret.php file:
include 'lib/EpiCurl.php';
 include 'lib/EpiOAuth.php';
 include 'lib/EpiTwitter.php';
 include 'lib/secret.php';
We do so as we’ll be interpreting everything in our index.php file.
- The rest of the code just helps in getting the user logged in to Twitter using the access tokens.
$twitterObj = new EpiTwitter($consumer_key, $consumer_secret);
 $oauth_token = $_GET['oauth_token'];
 if($oauth_token == '')
 {
 $url = $twitterObj->getAuthorizationUrl();
 echo "<div  style='width:200px;margin-top:200px;margin-left:auto;margin-right:auto'>";
 echo "<a href='$url'>Sign In with Twitter</a>";
 echo "</div>";
 }
 else
 {
 $twitterObj->setToken($_GET['oauth_token']);
 $token = $twitterObj->getAccessToken();
 $twitterObj->setToken($token->oauth_token,  $token->oauth_token_secret);
 $_SESSION['ot'] = $token->oauth_token;
 $_SESSION['ots'] = $token->oauth_token_secret;
 $twitterInfo= $twitterObj->get_accountVerify_credentials();
 $twitterInfo->response;

 $username = $twitterInfo->screen_name;
 $profilepic = $twitterInfo->profile_image_url;

 include 'update.php';

 }
After that we define the variables twitterObj & oauth_token to make it easier for us to connect and authenticate with Twitter. Then we open our if statement and check the oauth_token which is our access tokes for the account that will be authenticated with Twitter. We then redirect the user to Twitter’s authentication page using the $url which is defined in one the library files. The $url is made using the access token and the oAuth login link. One of the sample $url is:
http://twitter.com/oauth/authorize?oauth_token=c1iKl42xnvOA76jIqzV4zXRVqFZcYJlYBQsXJC4Hbhw
You can clearly see how Twitter well Twitter uses the oauth_tokens. After that we just open our session with Twitter and then get the profile information of the user from Twitter:
$twitterInfo= $twitterObj->get_accountVerify_credentials();
 $twitterInfo->response;

 $username = $twitterInfo->screen_name;
 $profilepic = $twitterInfo->profile_image_url;
Here we defined the twitterInfo variable which is in short getting a user’s profile credentials from the $twitterObj data and then we use the screen_name & profile_image_url functions to get the profile name and profile image of the logged in user. At the same time we are assigning variables to the profile name and profile and profile image which we will use in the update.php file.
After that we are also including the update.php file using the snippet below:
include 'update.php';
Now copy the code below to your update.php file:
<html>
<head>
<title>Twitter oAuth Application by 1stwebdesigner | Update your status</title>
<link rel="stylesheet" href="style.css" type="text/css" media="screen, projection" />

</head>
<body>
<h1>Hello and Welcome to the oAuth Tutorial</h1>
<?php $_SESSION['twitter_profile']; ?>
<div id="form"><!--Start form-->
<p>Twitter Handle: <?php echo $username ?></p>
<p>Profile Picture: <br /><?php echo "<img src='$profilepic' />" ?><br /></p>
<label>Update Twitter Timeline</label><br />
<form method='post' action='index.php'>

<br />
<textarea  name="tweet" cols="50" rows="5" id="tweet" ></textarea>
<br />
<input type='submit' value='Tweet' name='submit' id='submit' />
</form>
</div><!--End Form-->
</body>
</html>
This is just a simple HTML page consisting of small chunks of PHP code for showing the user’s username, profile picture of the user as uploaded on Twitter. The page also consists of a text box which the user can use to update his/her status timeline on Twitter. You might have noticed by now that I am using the index.php file for form processing. The code that processes this form and posts to twitter is the one below (already in our index.php file):
if(isset($_POST['submit']))
 {
 $msg = $_REQUEST['tweet'];

 $twitterObj->setToken($_SESSION['ot'], $_SESSION['ots']);
 $update_status = $twitterObj->post_statusesUpdate(array('status'  => $msg));
 $temp = $update_status->response;

 echo "<div align='center'>Updated your Timeline Successfully  .</div>";

 }
Here we are taking the data from the textbox named tweet and then posting it to twitter and then notifying the user that his/her message was successfully and his/her timeline was updated.
Our style.css file doesn’t have any special styles that we need to discuss here. They were just used to style the update form.
NOTE: You may want to add the character count and limit as Twitter doesn’t accept any Tweets which consists of more than 140 characters {Even from the API}.
You may now download the completed application files here but don’t forget to edit the secret.php file with your API keys as it won’t work without it. Feel free to build on the application we made today!
TWITTER APPLICATIONS YOU USE USING oAUTH
We all know that Twitter provides an easy-to-use interface for its users. The main advantage of using oAuth is that users can see what applications have access to their profiles. If you want to check that then you can do so by:
- Login through Twitter (web-service).
- Go to Settings after successful login.
- Then click on the Connections tab.
- On that page, Twitter gives a list of all the apps that have access to your profile.
You can check that easily by following the screenshot below:
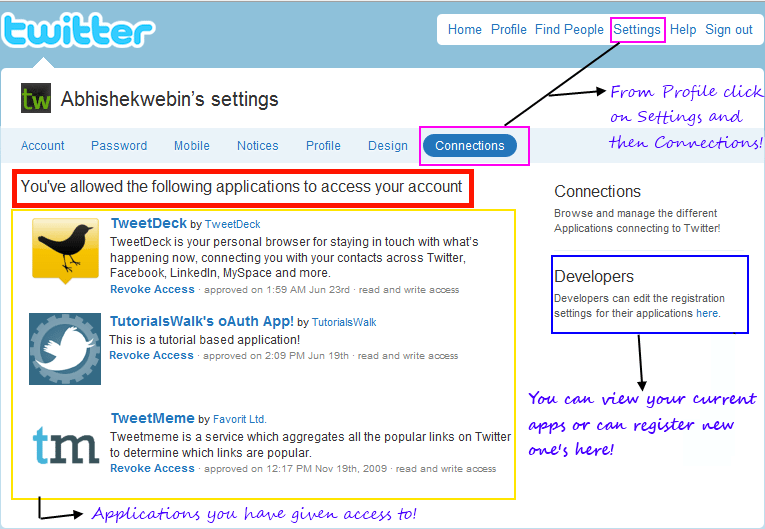
This is a screen-shot of my Connections page which is showing me all the Twitter websites/applications I have given access to!
FURTHER READING
- How to quickly integrate with Twitter’s OAuth API using PHP
- Using OAuth with Twitter
- Using xAuth, an alternate OAuth from Twitter
- Writing Your First Twitter Application with OAuth
There’s another great oAuth library for Twitter made by @abraham which can be seen in action here and it can be downloaded here. Tutorials regarding that library are available here!
That’s it! If you have anything to add or have a query then feel free to comment on this post. Thanks ;)
We now have the basic knowledge about creating simple app that updates our Twitter status. But wait, we have more, a complete marketing guide for Twitter. Care to join us!
This post may contain affiliate links. See our disclosure about affiliate links here.